12.24.2008

Merry Christmas!

Phew!  I don't know about you guys, but I am exhausted.  I spent yesterday cleaning, and rather than feel good about it, I now realize how dirty my house was and I don't know how I am ever going to keep up with it when I have two kids!  Can anyone else relate?

Anyway, Merry Christmas Eve!  I am excited to have nothing more trying to do today than to whip up a few little things for Christmas dinner.  The rest of the time I will be sitting on my couch!  We plan on going to a candlelight Christmas Eve service tonight, and then spend tomorrow in our PJs for as long as possible.  :)

Wherever you are, I hope you have a wonderful Christmas!  You all have been such a wonderful (and unexpected!) blessing to me this year.  

I am taking some time off from blogging while my husband takes some vacation time, too.  But, I'll be back when he goes back to work on January 5!  Of course I will let you know if any baby news breaks (Get it?  Breaks?  As in water?  Wow, I must be really tired.) between now and then.

Merry Christmas and Happy New Year!  


12.23.2008

My Christmas Table!

Oh my gosh, I can't believe it is December 23rd!  As a kid, I always thought this day had a little magic all it's own.  Today I will be cleaning the house in preparation for some family coming to stay on Christmas Day.  Magical, right?

Yesterday I managed to put the Christmas table together, mostly because it is more fun than cleaning the house and I wanted to see how the new Christmas china looked.  What do you think?

I am really happy with it!  This is the first year that I am using my wing back chairs as part of the seating for the dining table, and I love how they look on either end.  Now just imagine this whole scene at about 7 p.m. with the lights down low and the candlelight glowing.  I hope it will be as pretty in reality as it is in my head!
 
I also wanted to show you my water goblets.  I bought these at Cost Plus World Market, and I love them because they have little bees on them.  Very French, no?

My menu for Christmas dinner is pretty simple.  We're starting with rosemary roasted cashews and an old family favorite, artichoke dip and bagel crisps.  For dinner, it's beef tenderloin with two different sauces on the side: a sour cream blue cheese and a mustard horseradish sauce.  Both can be made in advance, so yay for that!  We're also having roasted asparagus, creamy scalloped potatoes, and Parmesan and thyme popovers.  Of course, lots of Christmas cookies for dessert!

Now if I can just get the dog hair and dust bunnies off the floor before the guests come, I will be all set!


12.22.2008

'Twas the Weekend Before Christmas

'Twas the weekend before Christmas, and I should have been using these:

But instead I spent my weekend baking and eating.  (Poor pregnant girl that I am!)

We made a simple Christmas ornament for Nina, as we do every year.  Someday this hand print will look so tiny!

And we watched Daddy's favorite Christmas show,  "Emmet Otter's Jug-Band Christmas."  Does anyone else remember this?  Nina and her daddy had a little dance party during the music scenes!  (Frankie the dog is not impressed.)

We also spent an inordinate amount of time with this book below.  Still no baby names for either a boy or a girl, and we are T-minus 6 weeks or so!  They don't let you leave the hospital until you have a name on the birth certificate, do they?

How was your weekend?


12.19.2008

My "Keeping Room" at Christmas

A while back I showed you all my front room, alternately called my living room, keeping room, and what-the-heck-do-I-do-with-this? room!  Click here if you want to see what it normally looks like, and the process I went through to redecorate it.  Definitely worth all the fuss, though, because it was so fun to decorate for Christmas!

Every year I buy a few bags of cranberries to put in my glass candle holders.  So easy, and I love the color of the cranberries with the white candles.

I have a little tree for my front window that holds my "Twelve Days of Christmas" ornaments.  I never noticed how many birds are in that song, until Nina and I unwrapped these, and she kept saying "What's that Mommy?" and I kept saying "It's...uh...another birdie, Nina!"

As you saw a few days ago in my kitchen/dining room, I love these little pepperberry wreaths, and I think they look cute hanging from a chandelier!  

Here's our little manger scene.  Nina loves to come and look at the characters, and she tells me the baby Jesus is "a good boy."  Don't you love it?

Here's some simple berry garland going up my staircase.  I found these at Goodwill in July, can you believe it?  And that poinsettia at the top of the stairs is another Goodwill find, totally fake, for $5!  Thank God, because it would be dead by now if it was real!  (I am not a gardener.)

We are hosting Christmas dinner this year, so I think I will open up the dining room table in this room for the big feast.  It will only be the second time I've ever hosted a dinner in here!  I'll be sure to show you photos next week as I get the table all ready.

Have a great weekend!

P.S. Someone asked about the photos on my stairway and how I hung them.  If you want to read more about it, check out this post!


12.18.2008

Homemade Oreo Cookies

OK girls, this is serious.  I went to a party last weekend and I told my friend I would bring something sweet.  This was the perfect opportunity to try a new recipe, because usually around the holidays I feel like I need to stick to "the old standbys" that my family loves.  I know you know what I mean!

But since this was a party, I felt like I could branch out and try a new cookie.  I am SO glad I did!  These are called Homemade Oreo Cookies, and I probably don't need to say much more to get your attention!  But just in case...

...don't they look amazing?  They remind me of those Little Debbie cakes from when we were kids, but they really do taste more like a homemade Oreo.  I dare you to try these and not eat the whole batch!

I found these at one of my favorite cooking blogs, Smitten Kitchen.  Go over there and check out her other amazing recipes!

Homemade Oreo Cookies

For the chocolate wafers:
1 1/4 cups all-purpose flour
1/2 cup unsweetened cocoa powder
1 teaspoon baking soda
1/4 teaspoon baking powder
1/4 teaspoon salt
1 1/4 cups sugar
1/2 cup plus 2 tablespoons (1 1/4 sticks) room-temperature, unsalted butter
1 large egg

For the filling:
1/4 cup (1/2 stick) room-temperature, unsalted butter
1/4 cup vegetable shortening
2 cups sifted confectioners’ sugar
2 teaspoons vanilla extract

1. Set two racks in the middle of the oven. Preheat to 375 degrees.

2. In a food processor, or bowl of an electric mixer, thoroughly mix the flour, cocoa, baking soda and powder, salt, and sugar. While pulsing, or on low speed, add the butter, and then the egg. Continue processing or mixing until dough comes together in a mass.

3. Take rounded teaspoons of batter and place on a parchment paper-lined baking sheet approximately 2 inches apart. With moistened hands, slightly flatten the dough. Bake for 9 minutes, rotating once for even baking. Set baking sheets on a rack to cool.

4. To make the cream, place butter and shortening in a mixing bowl, and at low speed, gradually beat in the sugar and vanilla. Turn the mixer on high and beat for 2-3 minutes until filling is light and fluffy.

5. To assemble the cookies, use a knife to spread the cream onto the flat part of one cookie. Place another cookie, equal in size to the first, on top of the cream.  You could also do this with a pastry bag if you are feeling really fancy.  Continue this process until all the cookies have been sandwiched with cream.

6. Try not to eat every single cookie before your family knows you made them!


12.16.2008

WFMW: A Christmas Card Miracle!

I'm glad you stopped by today to witness this great Christmas miracle.  OK, it's not as amazing as the birth of Jesus, but we can still celebrate!  What am I talking about?  Take a look below:

Those, my friends, are my Christmas cards.  Stamped, stuffed, sealed.  They went out in yesterday's mail.  Why yes, that is a miracle unto itself!  But wait, there's more!  I want to do something that I avoid doing at all costs to share with you the extent of this miracle: Math.

A few months ago, I told you about my love of Scrapblog.  You can see that post here, but basically, I discovered that I could design cute things on this digital scrapbooking site and then save them as .jpeg files.  These files can then be given to any printer to print as a regular photo.

So, my first step was to design my Christmas card on Scrapblog.  Now comes the Math part.  Brace yourself.

Printing of 100 (4x6) cards................$14.49
100 (4x6) envelopes (Walmart!)......$8.88
100 stamps...........................................$42.00
TOTAL.......................................$65.37

Isn't this amazing?  Originally, I went to Kinko's to print my cards, and they were going to charge me $60 just to print, not to mention I would have had to cut each one out myself, and the clarity of the picture wasn't very good.  If I had gone that route, I would have spent over $110 in total and had Lord-knows-how-many paper cuts!  Instead, I just sent my .jpeg file to Kodak online, and a few days later, this lovely package came to my door.  Great clarity, great color, and already pre-cut to the 4x6 size!

If you like to design things like this yourself, I highly recommend Scrapblog and Kodak, or one of the many other online tools like them.  I am so happy!  And here's my finished Christmas card (with our last name blotted out).  Merry Christmas!

See what I mean?  A $65 Christmas miracle!  Works for Me!


Cozy Kitchen and Dining Room

If you're coming over from Kimba's fun Holiday Open House Party, WELCOME!  (The rest of you, as usual, are always welcome!)  Take a look at my kitchen and dining room decorations below, and feel free to check here for my family room all decked out.  Merry Christmas!

As I sit and type this, it is 9 degrees outside.  Seriously cold!  I feel so blessed to be warm and cozy in my house, as the snow falls outside and a fire burns in my fireplace.  

Part of the reason I feel so cozy is the face that I have this view as I sit in my family room:  


My walls are a warm buttercream color and I love how the cabinets and floors look with it.  Then, add in the reds and greens of Christmas, and it just doesn't get any better!  Don't you love the little twinkle lights of the Christmas tree on top of my fridge?  So cozy!

To jazz up the chandelier I just tied some simple pepperberry wreaths with some lime green grosgrain ribbon.  Fun!


My Christmas plates, above, look so cute on this little shelf.  The simple winter scene is so quaint, and I just think the colors look pretty together with a few candy canes peeking out.


Lastly, I just started my Christmas china collection, above, for all those future Christmas dinners I hope to have at my house.  I love how they resemble a red toile pattern, but have the unmistakable Christmas feel to them.  I got them at Home Goods, in case anyone else is on the hunt!  

Thanks for enjoying the coziness with me!


12.15.2008

My Christmas Addictions

Happy Monday to you!  I am belated in getting Thank Yous out to the following people for these awards!
  • Heidi Boos gave me a lovely lovely "Butterfly Award"!
  • Nicole from The Graves' House gave me the "Superior Scribbler Award"!
  • Vintage Girl at Heart gave me the "Kreativ Blogger Award"!
  • JennyKate gave me the "Christmas Spirit Award"!
  • Ruby Red Slippers passed along the "Blog Friends Award" and I just love what she said on her blog about how unexpected it is to be friends with all these people through blogging, that she never thought it would happen, but it did!  I couldn't agree more!
Next, Princess Mimi tagged me to participate in "Five Big, Tall Christmas Wishes to Change the World."  Phew!  That's a tall order!  Not sure I even know what to wish for to change the entire world, but maybe just my little corner of it.

1. I wish for my daughter and unborn baby to grow into kind, confident, and God-loving people.
2. I wish to model to my kids how to have and be a real friend.  My mom modeled this for me, and I think it's why I have such strong friendships today.
3. I always pray that my daughter (and my other children who I don't know yet!) will find a spouse who loves her even more than her father loves her.  I can't think of a man who loves her more in the world, so this standard is pretty high!
4. I wish for a childhood for my kids where they feel safe, loved, and part of a huge community of people who love them.
5. I wish for years upon years upon years to spend with my husband.  That we will get to be empty nesters and parents of the bride and grandparents and old farts together.

Thanks to Andrea Leigh for a fun award called "Your Blog is Fabulous." It asks me to list five of my addictions, which should be easy!  I am going to make this a Christmas-themed list!

1. I am totally addicted to Starbucks Salted Caramel Hot Chocolate with a shot of Espresso.  Oh My Gosh.  You just have to try it to know the goodness!
2. My favorite Christmas movie, which I have to watch at least a few times each season: "White Christmas."  My sister and I sing that song (appropriately named "Sisters") whenever the mood strikes throughout the year.
3. My favorite Christmas song.  It has to be, without a doubt, "The Christmas Song" by Nat King Cole.  I tear up when I hear it for the first time every Christmas season.  Here's a picture of Nat King Cole...and by the way, it has to be his version of the song!  No Top 40 Remake for this one!
4. Looking at Christmas lights at night.  My mom tells me I was always enthralled by the lights as a kid.  I still am!  We still have to take a nighttime drive through the neighborhood with some hot chocolate to see them all!
5. The way you feel when you wake up Christmas morning, still lying in bed before you get up and start the madness.  I just lie there for a few minutes and take it all in.  I love the anticipation!

OK, so if you are still reading this, please tell me what your Christmas addictions are.  I can always use some more!


12.12.2008

Homemade Cinnamon Christmas Ornaments

Nina and I have been house-bound a lot lately, with the weather being treacherous and the fact that I, you know, waddle.  Last week it dumped a bunch of snow, so I decided to make these little cinnamon ornaments for our mini Christmas tree.

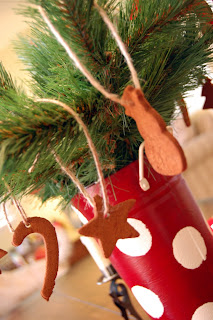
The ingredients are pretty simple: 1 1/2 cups of powdered cinnamon, 1 cup of applesauce and 1/4 cup of Elmer's school glue.  Just combine these in a bowl and knead together until it forms a dough (you can add a little water if the dough is too stiff).  Let it sit for 30 minutes in the bowl, then just roll it out like regular cookies and use cookie cutters to make Christmas shapes.  I used more powdered cinnamon to spread on the counter to keep the dough from sticking.  Use a drinking straw or toothpick to create a little hole at the top of each cookie so you can thread a ribbon through it later.

Cook in a 170 degree oven for one hour, turning over halfway through.  Allow to cool.  I actually left mine out overnight to harden before we strung them.  Ta-da!

Here's a few photos of the whole process.  Nina loved cutting out the cookies!

Here are some of the shapes when they were all ready to hang on the tree!

I ran out of red ribbon but this twine looked cute too!

We hung the cookies on the little pine branch centerpiece on my kitchen table.  Nina loves to talk about it when we are all sitting there.  She is so proud of herself!

And of course I love how cute the ornaments look!

(I apologize to the person whose blog I found this on.  I have been hunting but can't seem to remember who posted the recipe.  If it was you, or if you know who it was, please tell me so I can stop hogging the credit!)

Have a great weekend!


12.11.2008

A Craft For the Really Budget-Conscious!

A girlfriend of mine sent this to me the other day.  It's a hilarious potential craft for any of us who are really trying to make ends meet this Christmas...

My dear Friends and Family,
This is somewhat embarrassing to admit, but Christmas will be tight this year.  I will be making bedroom slippers for you all as gifts.  Please let me know your sizes.  You'll most likely agree that it's a splendid idea, and should you wish to do the same, I've included instructions below. 

Here's how to make bedroom slippers out of maxi pads: You need four maxi pads to make a pair.  Two of them get laid out flat, for the foot part.  The other two wrap around the toe area to form the top.  Tape or glue each side of the top pieces to the bottom of the foot part.  Decorate the tops with whatever you desire, such as silk flowers (this is most aesthetically appealing) or something similar.

These slippers:
* are soft and hygienic
* have non-slip grip strips on the soles
* have a built in deodorant feature to keep feet smelling fresh
* mean no more bending over to mop up spills
* are disposable and biodegradable
* are environmentally safe
* have three convenient sizes: Regular, Light and Get-Out-The-Sandbags 

I've attached a photo of the first pair I made so that you can see the nifty slippers for yourself.  Merry Christmas!

P.S.  Hope you all got as much of a laugh out of this as I did!  Kind of puts a new twist on Christmas craftiness, doesn't it?


12.09.2008

WFMW: Christmas-y Hostess Gifts

I feel like I have a Christmas party to go to every weekend this December!  I always try to take a little gift to the hostess when we go to parties.  Whenever we've been the hosts (and I can remember one party in particular which found me, after everyone had gone home, vacuuming the kitchen table because it had gotten so gross from the hors d'oeuvres) I really appreciated the people who thought to bring us a little something.  Parties are hard work!  It stinks to be the one left behind with the clean-up.  But they are so much fun too!

Anyway, back to the gifts.  Below are a few ideas of things to bring to a party this season.  I usually keep most of this stuff in the house, and I buy them when they go on sale so that I am not panicking at the last minute.

First, your average bottle of wine, perked up with a ribbon and a cute little spreader for dips and such:

Here's a close-up because I thought the spreader was so cute!

I usually have a stash of this type of stuff below around the house.  Teas, coffees, hot chocolate, and boxes of individually-wrapped biscotti.  I keep another stash of those clear cellophane bags (found at Michaels or similar).  Just put a few of these little goodies in a bag, throw in some tissue paper, tie it with a pretty bow, and tell the hostess that this gift is for tomorrow morning when she is too tired to make breakfast.  :)

How about buying cute kitchen towels when you see them on sale?  Then just tie one with a pretty bow and you have an adorable little gift that the hostess can use to hang for decoration...or to do the dishes when the guests go home!

Here's another twist on the wine theme.  (Can you tell I love wine when I am not pregnant?)  I bought a few generic vases when they went on sale at the end of the summer, and just added a vinyl letter and a cute ribbon.  This is a unique gift that the hostess can use at future parties to keep the opened bottles of wine from dripping all over her table.  (And yes, this photo was taken last month, so the pumpkins are giving me away!)

But don't you love the little button detail?  

Hopefully if you have a few of these items in a closet somewhere, it will be a little easier to get out the door to the next Christmas party.  Works For Me!


Horseradish Meatloaf

OK, I have a confession to make.  Do you want to know the number one thing that I have eaten during this pregnancy?  Mashed potatoes.  The way my mom makes them, with nothing but potatoes,  butter, cream, salt and pepper.  I have eaten them for breakfast, lunch and dinner, and they were the perfect bland food when I was nauseous in those early days.  Now I just eat them because it is cold and I want comfort food.

That being said, I am always on the lookout for recipes to make alongside the mashed potatoes.  Excuses, really.  We don't eat a lot of Chinese or Mexican food around my house anymore.  Why?  Because mashed potatoes don't go with tacos.  

Nevertheless, this recipe I am sharing is meatloaf, but not your boring old meatloaf, because it has horseradish in it.  Not too much, just enough to keep it interesting.  I have given this recipe to many of my girlfriends with kids, who say that their kids all love it.  (Although, I would recommend serving it first without the sauce to your kids.  It's much spicier with the sauce.)  My husband loves it.  I love it too, but mostly because it's a vehicle for my mashed potatoes. 


Horseradish Meatloaf

For the meatloaf:
2 pounds ground beef (I've tried this with ground turkey or chicken too, it's just as good!)
2 eggs, lightly beaten
1/2 cup dry bread crumbs
1/2 cup ketchup
1 T. horseradish
2 t. Worcestershire sauce
2 t. salt
1 t. onion powder
1/2 t. black pepper
1/2 t. mustard powder or Old Bay seasoning
1 clove garlic, minced
1-2 T. chopped fresh parsley (or 1 t. dried parsley)

For the sauce:
1/2 cup ketchup
3 T. brown sugar
1 T. horseradish
2 t. spicy brown mustard
1/2 t. mustard powder or Old Bay seasoning

Preheat oven to 375 degrees.  In a large bowl, mix all meatloaf ingredients together well (Although messy, it’s easiest to do this with your hands). Press meat mixture into a 9 x 5 inch loaf pan or form into a freestanding loaf in the center of a baking sheet.

In a separate bowl, whisk together the sauce ingredients. Spoon half of the sauce mixture on top of the meatloaf. Place meatloaf in a preheated 375 degree oven and bake for 50 minutes.
After 50 minutes, remove meatloaf from oven, spoon remaining sauce over the top and return to the oven for 10 minutes. Remove from oven and let cool for an additional 10 minutes before slicing.

My husband would like me to add that you can't really have too much of the sauce.  He loves it!  If you make extra, you can either spoon it onto the meatloaf or serve it on the side.  Whatever your family doesn't eat, just send my way so my husband can bathe in it!

Let me know if you try it!  

And guess what I am in the mood for now?  :)


12.08.2008

Christmas Decorations are Done!

My decorations are done!  Oh, I am so glad.  I hate having boxes and garbage everywhere, and for a few days my house looked like a Christmas bomb went off in it.  Yuck!  Things are put away now, and I am hoping we can sit back and enjoy our house for a few weeks.  

I am sitting on the couch as I type, enjoying the tree and listening to my old pal Frank sing Christmas carols.  Bing is here.  Oh, and Harry too.  (That would be Sinatra, Crosby, and Connick, for those of you who aren't on a first name basis with the boys.)

Where was I?  Oh yes, here are my Christmas decorations!

I have been collecting little Christmas wreaths over the years, and this one below was from a thrift store.  Doesn't it look cute on my window?  I just used a simple sticky hook to hang it.

My husband's family has been collecting Nutcrackers for years, and when we got married we inherited his set.  Some of them are specific to things my husband used to do, like stamp collecting (?) and boy scouts.  I love lining them up on our mantle, and Nina especially enjoyed unwrapping them this year.

I'll be showing you more of the decorations soon.  In the meantime, I hope you get a chance to sit back and enjoy your lights and tree and Nutcrackers sometime today!  (Oh, and throw a little Frank or Bing in there, too, if you can!)


12.05.2008

My Christmas Advent Calendar!

*Edited to answer a few questions: The scrapbook paper for the tops of these was purchased from Hobby Lobby. Also, I used Mod Podge underneath the paper, and also on top, to seal it. The size of the frame itself is 18x22 inches, and the size of the metal backing is 16x19. However, I don't think the size of the frame matters as long as you have enough room for all the boxes. I actually brought the frame with me to Hobby Lobby to make sure all the boxes fit.

Wa-hoo! Today's project has been over a month in the making. Ever since Chris from Just a Girl posted photos of her Halloween advent calendar, I have been excited to copy her for Christmas. I made a little tutorial out of this because I made a few mistakes along the way, and maybe I can help you from having the same troubles!

Start with these paper mache boxes. I got mine at Hobby Lobby when paper stuff went 50% off. They were 50 cents each.

The first step was spray painting them all. This was my biggest mistake. I'll be honest: I have no patience. There were 24 of these boxes, and 24 lids, and that means 48 little pieces that had to be individually painted. If I were to do it again, I think I would just leave them brown and call it "rustic." Again, this is probably just my impatience talking.

Next I got a cheap frame (Big Lots, $4.98) and painted it red. I plotted out where I wanted each box to go, so that the different shapes were spread out and not all clumped together. I also glued little magnets to the back of each box.

Then I added scrapbook paper to each box top, and a little number for each of the 24 days leading up to Christmas!

My adorable husband had to intercede and help with the last part. He bought a piece of sheet metal to fit the frame, and spray painted it with black chalkboard paint. He popped it into the frame, added a grosgrain ribbon, and the advent calendar is finished!

I love it! I plan to put little treats in each box, one for each day. I figure this advent calendar will work well for multiple children, because I can just put a treat for each child in each box, and they don't have to take turns the way my sister and I used to do with our advent calendar! (Oh, the horror!) Or I could include a cute "family togetherness" project for each day, or a Scripture verse for us to read. It's nice to have enough space in the boxes for a variety of ideas!

And please don't tell, but this year's treat will be Nina's gummy vitamins. Hey, she's two. What she doesn't know won't hurt her!

Have a great weekend! We are off to get our tree tonight and will spend the weekend Christmas-ing the house!


12.04.2008

Christmas Card Wall Pocket

Continuing on with my thrift store theme, I wanted to show you something else I made recently!  I have been needing a place to put Christmas cards that we receive, and found this little wall pocket for just a few dollars.

I removed the handle, spray painted the whole thing red, and then went to work on the details.

I think it turned out well!  I found the tree stencil online and printed it out on my computer.  Then I traced it onto the front of the wall pocket and painted it with a tiny brush, freehand.  Then just added a few little dots and a cute grosgrain ribbon on the top of the tree.  I love the colors!

Now we have a place to put all those great Christmas cards that will soon start rolling in!  

(P.S. If you are someone who has already sent out your Christmas cards, please don't tell me about it.  I am impressed, but also intimidated by you!)