10.22.2013

Our Forever House

Hello again friends!

Last but not least I am SO excited to show you what we've done to the outside of our house!  Looking at these photos, I can hardly believe how many changes we've made since last June.  Here's a photo of the house from the day we toured with the home inspector (and bug guy, apparently):


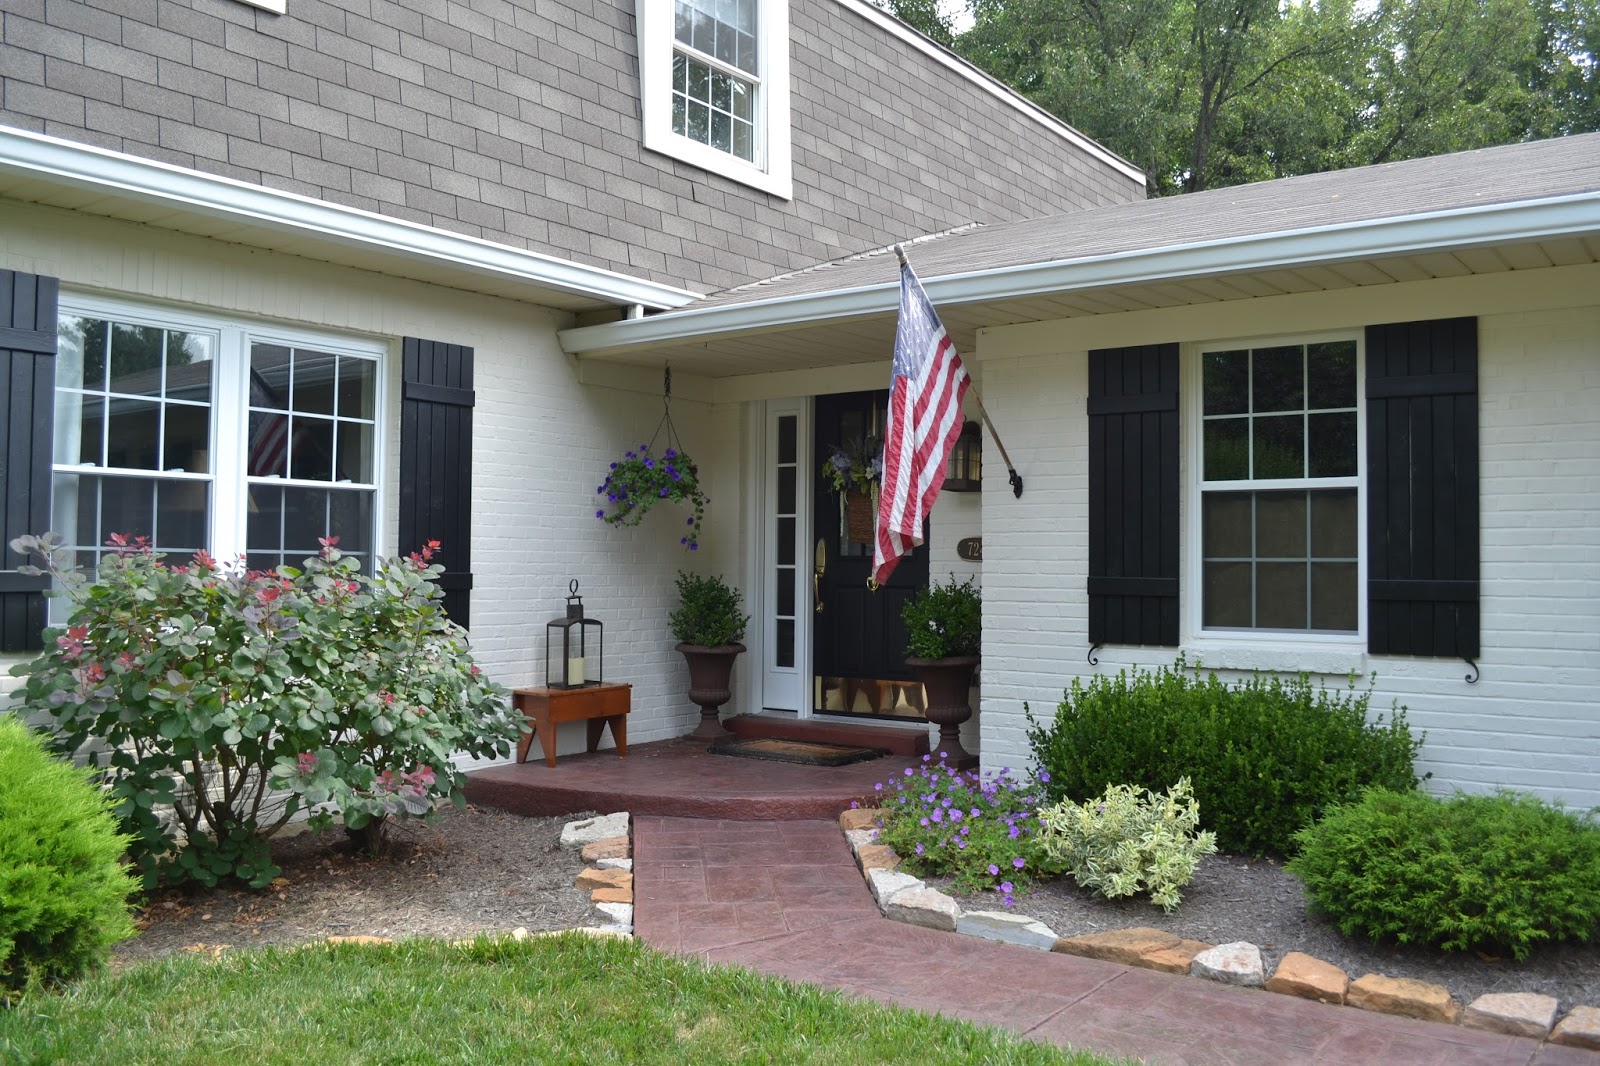
And...here it is today!


So, we've made some pretty big changes on the outside!  First up, obviously, was painting the lower half of the house.  We may have scared some neighbors in our traditional little neighborhood, being weird enough to cover over red brick!  But I'd always dreamed of having a white house with black shutters!  I've cut out picture after picture of them for years.  And, since we were only painting half the house (to match the existing siding), it wasn't terribly expensive!


We also replaced the front door and sidelight, as well as the exterior lighting fixture.  A big cost savings was that my ever-handy husband took on the job of making the new shutters himself.  I love that man.  The shutter style is called board and batten, and it took many weekends of cutting, sanding, priming, painting, and nail gunning, but the effect is worth it!  We added faux shutter dogs to the bottoms, just because we like them. (So I've learned, shutter dogs are those little hook-y things at the bottom of the shutters, to hold them in place.  Ours have no function except looking cute, because everything is bolted into the brick.)  :)


Here's a before photo of the back of the house.  You can see that all the flower beds, in the front and back yard, had teeny tiny rocks in them, instead of mulch.  I can't tell you how much these rocks stressed me out, especially when they started showing up in my kids' pockets, all over the floors, in between my dog's paws, you name it.  Those things just scattered everywhere!


Though it was a monumental pain (and rather heartbreaking when we considered how much the previous owners must have spent on installing them!), we gave all those rocks away for free on Craig's List.  It took my husband weeks to dig them all out of the beds, dump them on our driveway, reline the beds with weed barrier, and then shovel in loads and loads...and loads...of black mulch.  Thank goodness that was a once-in-a-lifetime kind of project!


A big selling point for us was always this large brick patio on the back of the house.  Here's a before shot:


...and the after.  Envisioning lots of great summer parties out here!


Our wood furniture fits perfectly around the outdoor rug I picked up from Ballard Designs last summer.  I spend lots of hours here watching the kiddos play on the play set, and it's nice and shady in the hot afternoon sun.

So there you have it!  Our renovation is mostly complete, and now you know why I haven't been hanging around my blog as much as I used to!  We found our forever house, and I am so thankful for it.  I hope you've enjoyed the tour!  :)


9.28.2013

Our Master Bedroom Re-Do

Hi everyone!  

First of all, thank you so much for your comments!  I have been so busy lately I haven't been in to "visit" my blog and respond to you, but I've loved reading them and hearing from you.  Please forgive me for not hanging around more frequently and chatting with you!

Almost done with the interior renovations in our house...and, as usual, the master bedroom had to wait a long time to get it's face lift.  But I'm so pleased with the result!  Here is a "before" of the master, with me standing in the doorway to get the photo:


And here it is today!  This photo is a little wider angle, but you can see that just moving the bed to a different wall really opened up the room.  We painted the room "Olive Gray" by Olympic (but we asked the paint store to dilute it by 50%, in case you're looking to get this same color for your room).  Don't miss my cowhide rug, which I love, from my local Ikea.


Below is another "before" shot of my (temporarily) invalid husband, then recovering from Achilles surgery.  On the far wall is the entrance to the master bath, and the door to the hallway is on the left.


(Kind of) the same shot, updated.  My buffalo check curtains have always lived in the family room, but by some happy accident I caught a glimpse of how perfectly they would go in the bedroom, and I just love them!


Here's just a shot of the dressing room portion of the master bathroom (which I won't be showing you in detail anytime soon, because it's WAY down on the list of renovation priorities!)


But in this next photo you can really see what a difference a little fabric makes!  I had extra curtains that I wasn't using anywhere else in the house, and I thought it might be nice to add some more texture.  I'm a big fan of hanging curtains around other things besides windows, just to keep things interesting!


And I've saved the best for last...up next is the exterior of our house.  See you soon!  :)


8.23.2013

Our Brilliant Idea for TV Storage!

Good morning!

I'm taking a break from "before and after" to show you our new TV armoire, because I think this is a brilliant idea!  We had a rather shallow/narrow space in our family room to put a TV, and I didn't really want to mount it on the wall (mostly because I didn't have the mental energy to decorate around a TV on the wall...it seemed easier to stick it in something...but what?).  A typical entertainment unit or armoire would have been way too deep for the space, and it would have cut into the primary walkway through the room (refer to the photos below to see what I mean).  

So we scoured Craig's List and found an old china cabinet for $50.  You can see it below in all it's glory.  I think the people we bought it from were...um...surprised that anyone wanted it!


My husband removed the glass doors and reworked some of the wood trim, and I painted the whole thing (Annie Sloan Chalk Paint in Chateau Grey with dark wax on top, in case you're curious!).  We added some new hardware too.  It ended up being only 18 inches deep, perfect for a flat screen TV, and gives us extra storage in the bargain! 


I don't know why I never thought of it before!  With TVs being so skinny these days, why buy a big old piece of furniture to hold them?  For us, this was the perfect solution!


Next up is our master bedroom renovation...see you soon!  :)


8.07.2013

My Family Room & Kitchen

Hi everyone!  I'm back to share some photos of our family room renovation, with a little kitchen thrown in too.  These areas are connected, and definitely contain the majority of our "living" in this house.  When we're awake anyway.  :)

The feel of the house when we bought it last summer was cozy, but I knew I wanted to make some changes to reflect our taste.  Here is a "before" of the family room:


And here is the "after," from basically the same angle.  I stepped backward a few more paces but you get the idea!


I actually painted this room a warm green/beige at first, but within 24 hours I knew it was the wrong color!  The room doesn't get a ton of direct sunlight and the color felt cold.  My husband, who is ridiculously patient with me, agreed to add this board and batten wall treatment to give the room some interest.  Then I painted the upper portion of the wall "Echelon Ecru" by Sherwin Williams.


Here's a "before" of the fireplace, which is wood burning and was one of the main things I loved about the house.  I think I cried the first time we used this...on a chilly day...in September.  A little eager?  :)


The "after."  We painted the whole fireplace white ("Roman Column" by Sherwin Williams) and it updated the look instantly.


This next photo gives you an idea of the kitchen, which is adjacent to the family room.  I am standing near the fireplace to take the photo, if that makes any sense!


I'm not showing you too much of the kitchen, because, other than paint over the plum color on the walls, we haven't done a lot.  We know that in the long-term, we hope to give the kitchen a major overhaul but that takes lots of cash, as we all know!  We'd rather save up and do it right in a few years. In the meantime, it's functional, and I can dream!


 This last photo is my favorite, because it gives you a sense of how the room "feels" when you walk in now.  I love the textures and colors together.  The seagrass rug was a $50 Craig's List find and the antique Persian rug on top was something I found at an antique shop in Ohio's Amish country...all balled up and forlorn, filthy, just waiting for me to come and rescue it!  (And on a related note, I now know how to hand-wash antique rugs in my driveway, in case you ever need to know.)


We're almost done with our home renovation tour...I'll be back soon with some more details!


7.11.2013

Entryway, Powder Room and Laundry Room Reveal!

Hello friends!  I'm finally getting around to showing you all some more of the renovations we've been up to in the year since we bought our new house!  I like to call this section "Wallpaper. Wallpaper.  Wallpaper." 

We'll start with the entryway.  I've always wanted a little entryway to welcome people into our home, and it's so fun to decorate because it's so small and cute...totally manageable!  Here is the before:


And here is the after!


We removed two layers of wallpaper, replaced the lighting fixture, and painted out all the trim white ("Roman Column" by Sherwin Williams).


The above shows a view of the front door from another angle, with more dated wood trim.  The below is after we replaced the front door and side light with something a little more up-to-date. (I'll show you some exterior shots soon!)


Next we have the powder room, which, if you're keeping track, is off the hallway that I briefly showed you in the "before" shot above.  It's a huge bathroom, and I love that!  But it was pink, and didn't really go with any of our decor.


Strangely, after all the wallpaper we removed throughout the house, the powder room was the one room we ended up adding wallpaper.  However, have you checked out the price of wallpaper lately?  Phew!  I didn't want to spring for the whole room, so my husband added a chair rail about halfway up the wall.  It cut way back on how much wallpaper I needed, and I like that the lower painted portion keeps it from getting too "busy" in there.  :)


Another angle, this one of my favorite new mirror from Ballard Designs!  And a little corner of the chandelier (from Home Depot) that I got to put in the bathroom...never done that before!


Lastly, we have the laundry room.  This was tricky.  The laundry room is the only direct access point to the backyard patio (door on the right in the photo below), so I couldn't just close the door and forget about it.  However, it's also the entry point from the garage (I'm standing in the garage entry door for the photo below) so it needed to be functional, too.  Here is the before:


And here's what we did!  Painted all the wood, removed the wallpaper, and added a cute lighting fixture.  We also removed that waist-height cabinet on the left.


My gifted husband was able to build me this wall, with some simple boards and hooks and paint, which I love to use as a dumping ground for all our coats and backpacks when we walk in the door.


Eventually we'd love to build a wooden counter to go over top of the washer and dryer (basically so I have more room to put junk when we walk in through the garage!) but for now this is doing the job.  And it looks pretty when we walk through there on the way to the backyard!


Thanks for hanging in there with me!  I've got a few more renovations to show you, if you're still around!  :)


4.15.2013

Our New Living and Dining Rooms

Hello friends!  (If you're still my friend after all this time!)

I will start by saying that we've been busy since our move to Cincinnati last June.  Busy with the house, busy with school (kindergarten for Nina, pre-school for Henry), busy with jobs (Brent works from home and the move has been great for him.  I am still working as a mama-at-home.)  My immediate family mostly lives in Ohio so we've been busy with them too.  We are happy and feeling so very thankful for what we have in life.

But occasionally one of my friends or long-distance family will say to me "Seriously?  With Nina and Henry's rooms on your blog?  Still?  Can't you post something new?"  :)  I admit, my heart has been more into doing the projects than posting about the projects, but after my long absence, we've managed to get quite a bit done.  I thought you might like to see!

Here is a before shot of our living room/front room/whatever you want to call it.  This and the dining room (which you can see connects on the left side of the photo) were the only rooms on the main floor that hadn't been converted to hardwood floors...


...so the first thing we did was convert them!  I think the house is happy to have her floors all shiny and new throughout the first floor.  We also attacked all of that dark wood trim.  (Although most of the time it felt like it was attacking me, not the other way around!  That stuff can really soak up the paint!)  I love how much brighter the whole room feels.


Another angle of the room gives you a sense of how large it is.  I struggle with placing the furniture in such a way that it doesn't achieve the "spin cycle effect," where everything looks like it's just smashed against the walls.  Placing my desk at a right angle from the wall seemed to help a bit.


This room gets a ton of light and I love to sit here and read sometimes.  The armoire in the background is great storage for all my junk that no one wants to see!


Here is a before shot of the dining room.  When we got into the redecorating, we realized there had been wallpaper in this room that the previous owner had painted over with a sponge technique.  We had no choice but to just paint over it: that stuff wasn't coming down!  Still crossing my fingers that it holds up with all those layers on the walls!


Here is the dining room now.  Lots of fresh paint, new curtains, new chandelier, new hardwood floors.  My husband augmented the chair rail that was already in the room with some vertical boards to make it look like board and batten.  We just painted the entire lower half of the wall, including trim, the same color, and it turned out great!


Here's a view of the room as you're standing in the living room.  You can see my kids' silhouettes and my collection of pretty dishes hanging on the walls.  The gorgeous fabric on the pillows that flank the hutch is called Bosporus Toile, and I got it at this website.


We've done a lot more so I hope to have the time in the coming weeks to share it.  I've listed my paint colors below for you, in case it might help.  I hope you all are doing well too!  :)

Living/Dining Room Trim Color: Sherwin Williams "Roman Column"
Living/Dining Room Wall Color: Sherwin Williams "Sea Salt" (mixed at 60% strength)