8.29.2008

Taco Soup

Phew!  That's about it.  I am wiped out.  We just got back from a mini-camping trip with Nina (her first!) and I am exhausted!  We only went for one night, about ten miles down the highway to a local campsite.  Nina did alright, but between her flailing around in her sleep (how many elbows to the face can one mama take?), hourly train drive-bys, Nina's constant wakings because of all the weird noises and the 5:30 wake-up call, we are done!  I was planning something a little more fancy for today's post, but girls, I got nothin!

Instead I thought I would share the recipe for one of my favorite stews, because, coincidentally, we had it for lunch today when we got back from our sleepless-night-in-the-woods.  With the fall weather on the way, and the crisp and cool air, this Taco Soup is so good!  If you like Mexican food, this will be a big hit in your house!  Plus, it seems to get better as it bubbles away on the stove, so you really can't mess it up.

I hope everyone has a great Labor Day weekend!  I will be back on Tuesday with some more projects that were supposed to get done this week...

Taco Soup
1 1/2 lb. chicken breast, cooked and cubed or shredded
1 medium onion, diced
1 Tablespoon olive oil
2 cans (15 oz. each) pinto beans, drained and rinsed
2 cans (15 oz. each) black beans, drained and rinsed
2 cans (28 oz. each) diced tomatoes, liquid included (I use Muir Glen fire roasted...adds a little kick!)
2 cans (15 oz. each) chicken stock (or more if you prefer a soup rather than a thick stew)
1 (8 oz.) block cheddar cheese, cubed (I use 2% cheese and it takes a little longer to melt but tastes great!)
1 packet dry ranch dressing
1 packet taco seasoning
1 1/2 Tablespoons salt
5-10 dashes of Tabasco sauce

Cook the chicken on the stove or the grill, if you are feeling really fancy.  Let cool and dice or shred into bite-sized pieces.  Saute the diced onion in a large soup pan until soft and translucent, 5-10 minutes.  Add all the other ingredients, including chicken, leaving the cheese until last.  Simmer 1-2 hours until cheese cubes melt and the flavors blend together.  Check for seasoning and add more salt, pepper and Tabasco as desired.  Serve with tortilla chips.  Yum!

Serves: 8.


8.28.2008

Rescued From Ugly

This little charmer was sitting all forlorn at a garage sale last week, and I just had to rescue it.  That weird wagon wheel thing on the top was not working for me at all, so I tore it out with some pliers.  Then I was left with these big holes around the edge where the wagon wheel used to be, so I bought some wood filler that was also made to be stainable.  (Yes, I know, I wanted to stain it and not paint it black!  Can you believe it?)

I filled the holes, sanded the life out of the top, and then applied a matching stain and a few polyurethane topcoats.  You can barely see where the holes were, and the stain matches the legs perfectly.  I think it turned out pretty well!  Not bad for a $5 garage sale bargain, right?


8.26.2008

Organizing Spices

**Updated at the bottom with additional information!

Today I am linking to Shannon from Rocks In My Dryer, who hosts a weekly "Works-For-Me-Wednesday" feature where people share tips that have made their lives easier.  Shannon's blog was one of the first I found when I was a new mama.  I can remember being up in the middle of the night with my newborn, reading her old posts on parenting and life with tears rolling down my cheeks.  I wrote an email to thank her, and she wrote me right back with the sweetest message.  So I guess I will always have a special little place for her in my bloggy heart!

Today I am sharing with you about something that works for me in the kitchen.  I used to have a cupboard all cluttered up with spices of varying sizes and shapes, and I could never find what I was looking for when I needed it.  I got this idea to put all my spices in jars of the same size, all labeled and organized.  Below, you can see the results:

Some of you will call me Type A (and you would be right!) but this has made a world of difference to my sanity.  I shopped around online for a place that sold these little tins, printed the name of each spice onto clear address labels (in a cute font, of course!) and there you go!  It saves me some time when I am cooking, but it is also secretly pleasing to this organizing junkie to see neat little rows of spices every time I open my cupboard!

Works for me!  (And I am sincerely sorry to those of you who this does not work for!  I know this is a pretty boring post if you are not a Type A chick like me!)

**To answer a few questions:
I found these tins a few years ago and the name of the company escapes me.  But I did a quick Google search for "spice tins" or "spice containers" and came up with this website.  I know there are others out there.  You buy them in bulk.  I think I had about 100 of them when I started!  The name of the font I used for the labels is Cezanne.  Lastly, yes I admit it, the spices are in alphabetical order!  Yikes, I need help! 


Shiny Brass Solution!

Okay girlies.  You asked for it, and here it is!  I have what I think is the best solution to the whole "I hate shiny brass" conundrum.  First of all, thank you for all your suggestions.  I was leaning towards painting the brass bed, just to be done with it, but so many of you said "Don't paint!  You never know when brass will be back!" and I think you are right.  It forced me to be a little sleuth and I am so glad I put the time into it.  Wait till you hear about my discovery!

It's called Brass Ager.  I talked to someone at a cabinet hardware shop near where I used to live in Cincinnati and he told me about this miracle solution.  He said it will age and darken brass; the more you use the darker it will become.  But the best part?  If, later on, you want to revert back to the original shiny-ness, it can be restored.  I guess you just shine it back up the way you normally would with brass.   Isn't that fantastic?

The only catch is that a lot of brass has a lacquer on it to make it shiny.  It's hard to tell until you get into the project if your piece has lacquer or not.  If it does, before you use Brass Ager, you have to use straight Acetone (easily found at Lowes or similar) to break down the lacquer.

Here's a picture of my lovely new friend, Brass Ager.  

I have scoured Denver for a shop that will sell this, to no avail.  I am guessing it would be just as hard for you to find it in your town.  Luckily, I found a place online that sells it.  Here is the link.  I know when I googled Brass Ager there were other shops out there, so this is by no means the only place to look.  

I should also mention, though, that if you have something brass that you want to paint instead of just darken, check my comments section on the original post for lots of good ideas and advice.  Screaming Meme in particular had some good pointers in my comments for painting brass.

In the meantime, I will be sitting on my front porch waiting for my little box o' Brass Ager to arrive.  I will definitely keep you posted when I've tried it.  Thanks again for all your ideas and suggestions!


8.25.2008

Is It Too Early For a Bubble Bath?

Yes, it's Monday.  I already need a bubble bath!  So I figured it would be a good time to do a little post on my master bathroom...after all, I can't be the only one who feels this way, right?

The other day, Nina and I came home from the pool all greased up from sunscreen, so after dinner I filled up the bathtub.  Although I love these candles in my bathroom, I think this is probably only the second time they've been lit in...six months?  I just don't usually take the time.  But I should!

My favorite thing about the bathroom is my little chandelier.  I always thought it needed some dimension above the bathtub, but didn't want to mess with running new electrical wiring to put up an actual light fixture.  My solution was to head over to my favorite antique shop, and I came home with this wrought iron thingy for about $25.  Not bad for what a big statement it makes!
When I actually light all the candles, it is practically daylight in there!  A bubble bath was the perfect way to de-grease myself from sunscreen, relax, and even get rid of some of those pregnancy aches and pains I've been having lately.  Perfect ending to the day!  I hope you find something just as relaxing on this Monday...


8.22.2008

Brass Bed Blues

Today I need your help!  We have inherited a twin-sized brass bed from my in-laws, and we plan to use it for Nina when she moves into her "big girl bed" in a few months.  Problem is, the bright, shiny brass is so not my style, but it is an old family piece.  I am more than willing to put some work into painting or antiquing it, but I don't know how! 

I've thought about painting it a creamy off-white, which I think would be really pretty, but I don't know what type of paint to use.  And then do I use a glaze on top?  Do I distress it somehow?  Do I leave part of it (like the knobs) brass?  

Or, is there some way, without paint, to distress brass so that it looks darker, almost like oil-rubbed bronze?  Could it become almost a rich brownish-black if I did that?

Just so you know, the picture below is the headboard, which is about 5 feet tall.  The footboard is in the same style, about 3 feet tall.

Advise me, oh wise friends in the computer!  Have you ever worked with brass pieces like this?  Please help me!  But more importantly, Happy Friday and have a great weekend!


8.21.2008

Five Dollars!

I seem to be having really good luck with bargains lately, and wanted to share a few of them with you!  Five must be my lucky  number, because all of these things were $5 each!  That's barely enough to make it worthwhile to open my wallet...I should just check under the couch cushions!

This first one was a thrift store find.  It was originally red, but that's nothing a little black paint can't fix!  Definitely worth the $5 price tag.

Next we have another thrift store find that was originally marked at $10 but was 50% off.  Yippee!  It even still has the tags on it!  It's meant to be a chalkboard, but since I already have one that is basically this same shape, I don't feel obligated to use it for that.  In case you can't see (sorry about the glare!) it is a little painting of an artichoke, with the French translation underneath.

And now, yet another thrift store find!  (I have discovered the best thrift store in town, right next to the ritziest neighborhood in Denver, yay!)  This little stool was just plain wood, but a little black paint and some sanding of the edges turned it into the perfect stool for little people to reach the sink in the bathroom!  Yep...$5!

I love TJ Maxx.  Who doesn't?  My favorite thing is wandering back to the clearance section, never sure of what I'll find.  The other day it was this cute lamp, and I left the tag on just to prove that it was, indeed, $5!
Last but not least is this barn star that I hung on the back of my house by my deck.  I love that it is asymmetrical.  I found it at this place called Real Deals Home Decor, which is a new discovery for me, but check out the link because I think there are locations all over the country!  Lots of great decorating deals and clearance items!  And OK, I cannot lie, this star was $10, but 10 is a multiple of 5 and it's really cute so I thought you wouldn't mind if I broke the pattern!

So good luck finding some bargains of your own!  I can't wait to see them!


8.20.2008

Rain and Dr. Seuss Cupcakes

Since Saturday, I've been wanting to share with you some photos from Nina's 2nd birthday party, but honestly, this is the first day I haven't felt completely exhausted by it!  Why, you ask?  Well, we had been planning to host the party in the backyard, complete with wading pools, a slip-and-slide, sprinklers, water balloons, squirt guns, and grilling out for the adults (24 of them) and kids (12 of them).  Guess what we woke up to on Saturday morning?  I bet you already know...50 degrees and rainy!  So it was on to Plan B.

My husband decided that we would have the party in the garage.  Classy, right?  We bought finger paints, lots of other little goodies for indoor play, and borrowed an inflatable bouncy house from our favorite neighbors.  It worked.  But it has taken me days to find all the lollipop sticky spots and leftover ground-up potato chips in my house, because, inevitably, despite our best attempts to keep the mess in the garage, you all know where everyone ended up.  The kitchen!  (Oh, and don't you love the above photo of all the dads just shoveling food in, hovering over the table as if it might try to escape?)

On to my good news: the cupcakes.  I found this amazing food coloring at Michaels, and it is so much better than the stuff they sell at the grocery store!  It comes in such a variety of colors and is easy to use.  (If you click on the link above you can see all the colors they offer.)  Check out my cupcakes below!

I thought the cupcakes looked like they could have been from a Dr. Seuss book or something.  Lots of fun colors!  And to make the swirls and dots in the icing I just used a plastic baggie with the corner snipped off and squeezed the icing through...no complicated pastry bags necessary! 

As for Nina, she never even knew that the party wasn't exactly in it's original form.  And once the cupcakes made their appearance, she was in heaven.  She even took a moment to share some of her green icing with daddy!  Who cares if she was in the garage?


8.19.2008

Black and White: Before and After

Today I thought it might be fun to do a little before and after.  I love to see other bloggers' transformations, so perhaps you'd like to see mine!

This one is about the landing on my stairs, which you see ahead of you when you walk in my front door.  When I have big wall spaces like that, I always get a little overwhelmed.  Below you can see a "before" photo of my stairs.  I mean really before, like before the house was done!

And below you can see what I did with it.  I love old family photos, and I love new family photos too.  And, of course, I love black and white photos!  So I just put them all together!

The hardest part was converting all my current photos to black and white, but that just meant lots of computer time and standing in front of the printer waiting for them to be done.  I already had quite a few photos of my grandparents and Brent's grandparents, even an old prom photo from my mom that she hates but I think is fabulous!

I love how the photos fill the space, and how easy it was to do.  I just pick up cheap frames at thrift stores or wherever, paint them black if they aren't already, and add matting, or go without.  People love to look at the photos when they come over, and I love to have somewhere to showcase them, rather than storing them in a box that never gets opened.  Plus I can add to the wall anytime I want, since I am not going for an overly-formal arrangement.  I have the same thing in my upstairs hallway, so lots of room to hang new additions!

I will also give you my very amateur way of hanging the photos.  I just started with a large one (in this case, Brent and me in the hospital with Nina right after she was born) and put it in the exact center.  Then I just kind of "eyeball" the rest of the photos, working my way out.  It is not perfect, but because the frames are all different sizes, it seems to work.  No one but you will ever notice if the spacing is off a little bit.  :)


8.17.2008

Mistreating Pillows

So over at the Nesting Place, the Nester is hosting a "Mistreatment Party." A mistreatment, as most of you know, refers to creating window treatments by using, shall we say, less-than-perfect methods.  I love this concept, even though I have no window treatments in my house (I opted for plantation shutters because all the decisions involving window treatments utterly terrified me).  Sewing?  Not so much.  Glue gunning?  Oh yeah!

In my house, already at my fingertips, I had some old pillow forms, a twin bed skirt that I bought on clearance from a Ballard Designs outlet, and no sewing skills.  What does that equal?  Pillow mistreatments!  I hope I can still qualify for the Nester's party...


I started with "Heat-N-Bond" iron-on adhesive, folded over each edge and ironed them to create straight seams.  As you can see from the photo above, the edges aren't all that straight.  I made two squares, a front and a back, for each pillow.  I use the term "squares" loosely here. More like squares with lots of squiggly lines. 

Then I found black plastic grommets that are supposed to just snap together.  I cut small holes in the corners of my fabric, but with all the folding and gluing going on, the fabric was way too thick for the grommets to snap through.  So I whipped out my glue gun, used it to attach the grommets to the fabric on both sides, and no one will ever know the difference...unless they look at the photo above, which clearly shows you the truth of the matter (and some really poor cutting).

Lastly, I used "Heat-N-Bond" and my iron again to attach the two sides of the pillowcase to each other, with the pillow form in the middle.  I threaded grosgrain ribbons through the grommets to hold the corners together, which is fun because I can change them out whenever I feel like it.  My summer color is lime green, but I think it's time for red because I'm in a fall mood! 

These pillows are far from perfect, but they help me pull the colors together in my dining room, as well as soften it up a bit (literally!).  And paired with my grandmother's chairs?  I love them!  Not sure if the Nester will think they qualify as mistreatments, but I should at least get points for how far I will go to avoid a sewing machine!


8.15.2008

The Magic of Chalkboard Paint

Just a quick little post since I am sitting on the couch with my hubby watching the Olympics (go Michael Phelps!) and vegging out.  A few people have mentioned my little chalkboard sign that I used the other day to wish Nina a Happy Birthday.  

That sign, I am proud to say, I found at a thrift store for $3.  Originally it had "little champ" (or something like that) painted on it.  I just taped the edges, sprayed some chalkboard paint in the center, and attached a big, fat grosgrain ribbon to hang it.  It is made of metal so it is perfect for writing with chalk.  It hangs in my kitchen and I just love scribbling little notes on it, like this one, written a few weeks ago when we were heading out to the county parade.

Thrift store finds are the best!  Hopefully I will have many more to share with you in the days to come.  OK, have a good weekend everyone!


Fresh Banana Bread!

Good morning!  We're getting a jump on the weekend with a yummy breakfast.  I just found this banana bread recipe, and I am in love!  It's from Cooking Light magazine, so I don't feel so bad about eating two slices for breakfast!  The bread is mild and sweet, and the cinnamon, nutmeg and cloves gives it a wonderful flavor with the bananas.  I usually add a side of fruit and some hot tea or coffee.  Nina loves it too.  Looking forward to this breakfast has gotten me out of bed a few mornings this week when I just didn't feel like it!

So, I will leave you with this recipe and hope that you have a wonderful weekend!  I'll be back bright and early Monday morning!

Healthy Banana Bread
from Cooking Light 

1/2 cup sugar
5 tablespoons butter, softened
2 large eggs
1 1/2 cups all-purpose flour
1 teaspoon baking soda
1 teaspoon salt
1/2 teaspoon ground cinnamon
1/4 teaspoon ground nutmeg
1/8 teaspoon ground cloves
1 (6-ounce) carton vanilla low-fat yogurt
3/4 cup ripe mashed bananas (about 1 1/2 bananas)
1/4 teaspoon vanilla extract
Cooking spray

Preheat oven to 350 degrees.  Place sugar and butter in a large bowl; beat until well blended (about 5 minutes).  Add eggs, one at a time, beating well after each addition.

Lightly spoon flour into dry measuring cups; level with a knife.  Sift together flour, baking soda, salt, ground cinnamon, ground nutmeg, and ground cloves.  Add flour mixture and yogurt alternately to sugar mixture, beginning and ending with flour mixture.  Fold in bananas and vanilla.  Pour batter into an 8x4 inch loaf pan coated with cooking spray.

Bake at 350 degrees for one hour or until a wooden toothpick comes out clean.  Cool 10 minutes in pan, then remove from pan and place on a wire rack to cool completely.  

Yield: 10 servings (204 calories each serving)


8.14.2008

Happy Birthday Nina!

Two years ago Nina Elizabeth came into the world, and I can't believe how fast the time has gone!  People told me to cherish every moment when your kids are small, but I think until you feel time slipping by too fast you don't get it.  In a sense, you don't know what you've got until it's gone.  

I am trying so hard to be more "in the moment" with my family, instead of focusing on my projects and to-do lists.  That's where it counts, doesn't it?  When you have a choice to stop being a multi-tasking mom and sometimes just sit on the couch and read a book with your child, or slide down the slide at the park instead of standing on the sidelines and waving.  How many magical moments like those make up my day, and how often do I miss those magical moments because I am too busy to take notice?  It breaks my heart to think of all I've already missed because I couldn't make myself slow down and take it all in.  

So here's to my big two-year-old girl.  God give me the grace to slow down for her today...but also everyday.


8.13.2008

Color! But Too Much Color?


First of all, I have to say, this blogging thing is fun!  Thank you to all of you who have made me feel so welcome here!

I was looking over my posts so far, and noticed that all the photos contained either black, white or yellow.  Predictable am I?  Yep!  But I thought I would break the color barrier a little bit by sharing this project.

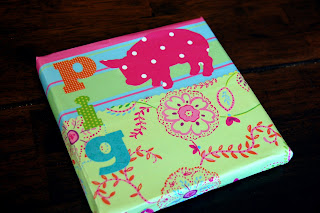
With the new baby coming, I have started to think about changing Nina's room from "baby" to "little girl" (sniff).  I thought these canvases would be a nice addition.  I recently found Kristin's blog, and this post and tutorial inspired me to try Mod Podge, even though I had never heard of it!  Turns out it is pretty fun-and messy-to work with!


So you can see I was copying Kristin's animal theme, and to do that I had to go online to find some stencils that worked.  No way I am talented enough to draw those babies freehand!

I found a website that had simple stencils, printed them out and then had to use my husband's printer to minimize them so that they would be the right size for my canvases.  (My husband works from home and wasn't at all annoyed that I was invading his work space in the middle of the work day...)

I think the pig is my favorite!  Anyway, then I just traced and cut out the shapes onto scrapbook paper, slapped some Mod Podge on there, and that's it!  The letters were actually stickers I found in the scrapbooking section of Michaels, so that saved me some time not having to cut those out!

Do you like them?  I love the style, but I wonder if the colors are a little, I don't know, psychedelic or something for a sweet and feminine little girl's room?  I kind of went crazy with the scrapbook paper, I was overwhelmed with all the choices and wanted one of everything!  


8.12.2008

Frenchy-French Obsession

So I think I have a really strange attraction to French things.  It's inexplicable, really.  I've been to Paris, once, but should that account for the alarming number of French-inspired things in my house?  I actually lived in Casablanca for a year, but do I have Moroccan things scattered every which way?  No.  I used to be an American history teacher, too, but you won't find a lot of 
Americana in my decorating.  Nope, it's French, and I have not a drop of French blood in me but can say "bonjuor" with the best of them! 

Anyway, below you will see a few examples of this.  The first sign says "laissez les bon temps roulez," which means "let the good times roll!"  I just love that.  I ran out of room towards the end there, so "roulez" is a little squished, but I can live with it.  It hangs above the window above my kitchen sink.  Anything to make washing dishes a little more interesting!


This next one is a little herb pot that I painted (very inexpertly) back when I thought I could keep plants alive.  I had dreams of snipping off little pieces of basil and thyme when I needed them for cooking.  Well, "les herbes" died in record time, but the pot remains and now holds some very cute (and very fake) greenery above my refrigerator!   


This last one is kind of self-explanatory, and ultimately that is why it now lives in a box in my basement.  I thought I would be all cute and have a "la toilette" sign on my powder room door, but the door is always open due to pregnant women (me) and toddlers (Nina) needing to get in there quick!  So who needs a sign when you can actually see la toilette from the hallway?


One thing I will say about painting the letters on signs like this: freehand is really hard if you are not artistic like that (and I am NOT artistic like that).  So I figured out that you can buy paint markers that allow you to smooth out any rough edges on your letters much easier than using a paintbrush.  In the future I will always use the paint markers, because my freehand looks really rough.  Anyway, if you can commiserate with me on this or other strange fixations, let me know!  In the meantime, I'll be the geek with the French-English dictionary and the paint markers!


8.11.2008

Belly Flop Baby

Oh, God help me.  My sweet little daughter, Nina, has recently picked up some very grown-up habits.  When did she learn to watch TV like this?  It used to be that even the most compelling kids' show would hold her attention for .5 seconds and then she would be running off to another adventure.  The other night we had friends over and let their daughter and Nina watch "Shrek" while we attempted to have adult conversation.  We look over to find them both riveted, and rivaling any teenage girl in their belly-flop-in-front-of-the-TV poses!  

What happened to my little baby?  She's turning two years old this week.  I am sad and excited at the same time.  (I am also planning Nina's birthday party in our backyard, so more on that later!)  I guess these feelings are God's way of helping women to be ready to have more kids.  Good thing since I am pregnant again!  Due in early February...which is a nice motivator to get lots of house projects done before then!


8.10.2008

Avoiding Laundry Duty

It's Sunday evening, and my husband has disappeared into the abyss known as "Men's Poker Night."  I am sitting here with my toddler, watching Max & Ruby on Noggin.  (I know that doesn't ring a bell with some of you, I am sorry!)  I should be doing laundry, or something equally productive, but instead I decided to blog about laundry, or, really, my laundry room.  Why not? 


First of all, I should say that even having a laundry room is something of a luxury for me.  Our old house (in Ohio, where I am from and where Brent and I met and married) was built in the 1920s and therefore didn't have anything as sexy as a laundry room in the original floorplan.  Instead, we hauled ourselves down our rickety basement steps to the cockroach-infested bowels of our house and...I am having flashbacks.  Let's move on.

So here we are in Colorado and we have a laundry room.  On the main floor of the house!  With a light that doesn't require a dangling string to turn on!  And NO cockroaches!  So what did I decide to do with it?  Paint it, of course!  This is a whole new decorating opportunity for me! Think of all the fun laundry-themed little goodies I can buy!  Above and below, you can see my very favorite of these goodies:

The laundry sign above my cabinets was so fun to come up with.  I had seen things like it in the Ballard Designs catalogue but knew I could do it myself for less.  So I started with buying the letters, but if you look closely you can see that the "N" is a different font than the others.  That's because JoAnn's didn't have any more N's and I was too impatient to wait for the letters to be re-stocked!  So I bought another font for the N and I actually really like the way it turned out...adds a little unexpected sassiness!  My husband screwed the letters to a piece of scrap lumber, and then I painted the whole thing black.  Voila!


These adorable jars are a new addition.  I found the smaller one on sale at Hobby Lobby, and the bigger one just a few days later at Target.  Same brand and everything!  As you can see, laundry has not been as high a priority as decorating, because I am out of detergent and have not gone out to buy more for the larger jar.  The smaller one holds Oxyclean, which we use every day around here for toddler-induced stains!

The other half of the laundry room that you can't see (because I am having photo trouble at the moment) has been turned into the pantry.  I would LOVE to have a separate pantry (a nice big butler's pantry...oh, someday!), but in the meantime, a large baker's rack-style shelf works well. 

So there you go!  Thanks for distracting me from laundry for a little while!


8.09.2008

Welcome!

This idea has been bopping around in my head for a few months, but I have to admit I am a little surprised at myself that I am following through with it.  Not that I have a problem with follow-through, necessarily, but I have wondered if, with so many talented people already in the blogging world, do I have anything to add?  I guess we shall see!  In the meantime...

I thought my first post could be about my latest house project.  About a year and a half ago, we (my husband Brent, daughter Nina, dog Frankie and I) moved into a new house in a suburb of Denver.  It is a new house, which is a first for us, since we generally prefer the style and character of older homes.  (Unfortunately, Denver's high housing prices kicked us right out of the market for any charming older homes that were bigger than a postage stamp!) I have spent most of my time on the interior of the house, but recently got fed up with the hodgepodge that was my front porch, so I mobilized.  Here is the only "before" photo I could find.  It's from before we even moved into the house.


What you can't see is that the front door was a lovely shade of pinky-red.  Where do these builders come up with these color combinations?  Actually, it wasn't terrible, but it didn't feel like "me," and so the whole front porch just sat there since I couldn't get past the front door color enough to do anything else.  Yeah, I am weird.  Anyway, here is the "after" photo of the door, along with some of my favorite additions.


The front door is now black, and I just love it.  I can't believe it took me this long to paint, it's so worth it!  The wreath is made of (I think) bay leaves, and I got it at my favorite local antique dealer/random flea market.  The topiary...oh, I am so proud of that thing!  It started out as a strangely green swirl of fake plastic leaves.  It looked so bad sitting there next to the natural greenish-brown in the wreath, but I just couldn't bring myself to buy something new.  So off I went to Hobby Lobby (or as my daughter says, "Lobby Bobby") and bought some greenery when it went 50% off.  A few snips of the wire cutters, a few glue gun burns and here we are!  Such an improvement.  The rooster next to the door was on clearance at Pier 1, and the little star was a $3 find at the my same favorite antique mall, with a dose of chalkboard paint.


Over in the corner of my porch is a little cafe table and chairs that I convinced my husband to buy when we were just dating (Why isn't he so easily convinced to buy things now that we are married?).  It had a terrible formica top that we replaced with this marble top that we found at a Crate and Barrel outlet in Chicago for $20.  The chairs were equally ugly (think Brady Bunch orange cushions), but a staple gun and some black and white toile material went a long way!  The little jute rug was another Hobby Lobby find (of course I used a 40% off coupon!).


I absolutely adore this pot.  It was a hand-me-down from my mother-in-law.  It is so French looking, at least to my completely unpracticed eye!  I will tell you something about the rosemary in the pot, though...those herbs are brand new from the garden store!  I have already killed one pot of rosemary this summer and needed a replacement.  How can I love the look of flowers and greenery so much but have absolutely no ability or discipline to keep them alive?  Anything that is alive in my yard by this point in the summer is due to sheer dumb luck!


So that's my latest project!  It is so much more fun to come home now and see a welcoming front porch.  Plus, I finally feel like our guests' first impression of our home is something that I am proud of...because when you walk through the door to our front room, it's all downhill from there!  But that's a post (and a cry for help) for another time. 


8.08.2008

Product Reviews & Giveaways

If you'd like me to consider hosting a product review and/or giveaway, please feel free to contact me. I look forward to learning more, and determining if your product is one that my readers would enjoy. I'm thinking more along the lines of home decorating, mama stuff or craftiness...not so much motor oil or farm implements!

For a product review, please know that you are responsible for all shipping fees and that I will keep the product once I'm through reviewing it, unless noted otherwise.

If I host a giveaway for your product, I prefer that you ship the item(s) directly to the winner. I will be responsible for obtaining all information from the winner(s) and giving it directly to you.

Please email me at buzzingsofaqueenbee (@) hotmail.com for more details!