
Showing posts with label crafting. Show all posts

12.08.2011

Postcard from Hibernation #6

Happy December to you all!

I have found a new favorite project and wanted to share. I just made this adorable sign for my kids' bathroom. What do you think? (Nevermind that neither of my kids can read!)

My husband bought some barn/fence wood from a guy off Craig's List. I love that about him! (My husband, not Craig.) He just cut some of the boards and attached them to each other in the back with some metal strips, then added a hook for hanging.

I printed some letters off the computer, then just traced them (pushing very hard) onto the surface. The wood was soft enough that it made an indentation where I had traced, and I simply went back with my paintbrush and filled in the letters. After that, I sanded to rough up the letters a bit, and slapped on a coat of polyurethane.

If you or your husband don't feel like buying old wood off Craig's List, you can just as easily go to Lowe's and have them cut you a piece of new wood. That's what I did with this Grocery sign that I made for our kitchen! I brought it home and banged on it with a hammer and nails and whatever else I could find in the garage. (Added bonus: aggression release.)

Then I stained the wood (which brought out all the bangs and dents I had just added), and traced some letters onto the wood, sanded, and polyurethaned, same as I did with the bathroom sign above. See? Looks old, but it's straight from the hardware store.

Instant vintage...I love it!


2.14.2011

Shadowboxing for Mamas

Hey everyone! Today I am posting at Your Baby Booty, all about making a shadowbox to hold some of those little baby and kid clothes that you just can't bear to part with. Come on over if you'd like to read more!


2.07.2011

"Art" for the Poor

What I am about to share could be considered sacrilegious to some of you. But I'm going to risk it, for the sake of the rest of us.

What in the world am I talking about?

Art.

I constantly rip out pages from magazines to use for inspiration. The pages above and below both have unique wall pieces that are real art. Like, from people who are artists.

Unfortunately, our budget for pieces of real art from real artists is nonexistent. But what I did have was two of these oval frames. With nothing in them.

I really liked the look of some of those line art drawings in my inspiration photos. But, alas, I am not an artist, and, well, we've already discussed where my budget is in that department. So, I went to Michael's instead and bought a piece of nice artist paper and some charcoal pencils.

I found some free clip art online. (I just Googled things like "free" "images" "bee," "bike," etc. until I found something I liked.) The bike is for my husband, whose garage is not complete unless it holds at least five bikes at any one time. And the bee is for me. :)

I used graphite tracing paper (also from Michael's) to transfer the line art onto my fancy paper.

Then I went back with my charcoal pencil and traced over the lines.

I mixed my knockoff bike and bee art with my family wall in the kids' playroom.

Thank you free clip art!


12.21.2010

My Christmas Advent Calendar

If you've been around here for awhile, you know all about my Christmas advent calendar. I made it a few years ago, back when Nina was a toddler and Henry wasn't even born yet!

Now that I have two kiddos, it's proven to be a great tradition for our family! The boxes are cardboard, with scrapbook paper on the lids. They are a great size to stash little goodies for each day. This year I'm using little chocolate coins from Trader Joe's. The boxes have magnets on the back so they can stick to the metal sheet that I framed and painted black.

Anyway, enough blabbing, Carrie! I wrote a detailed tutorial on how I made this, so if you're interested, just follow the link for more info.

I hope you have a great Christmas week!


12.10.2010

Re-Loving Old Furniture

Today I'd like to tell you about the desk in Nina's room. That desk has seen many lives. I got it (free!) from a friend of my mom's when I moved into my first apartment as a single girl. It was originally a honey-colored wood and I painted it white, even before I understood the utter magic of painting things white! And here is the desk in my Colorado guest room a few years ago. It's on the right side of the photo if you look close.

Fast Forward: Then my dad came out to visit us in Colorado in August of 2010. I coerced him into doing projects in my garage all day. And by the way, I think I know from where I inherited this "project" gene; he secretly (or not so secretly) loved it. Can you tell?

Anyway, my dad did some work on the desk to make it more stable on the bottom, and I took the opportunity to re-sand the piece. Here it is in Nina's new room today:

I changed out the knobs too. It's always amazing to me what a little change like that can make to a whole piece! (The new knobs are from Hobby Lobby.) I also added some scrapbook paper as drawer liner, with a little Mod Podge to help glue it down and seal it:

I also roughed up the drawer edges with sandpaper a little more. I love the effect!

Not bad for a freebie from ten years ago!

Do you have a piece of furniture sitting around that you could "upgrade"? Before we all head out to the malls, or even to the Goodwill, it's even easier to wander downstairs to the basement or out to the garage. I still have a few pieces that I'd like to paint or update, right here in my own house, without spending a dime!

I'll be back with more next week. Have a great December weekend!


12.08.2010

Birdie Brigade

I promised I would share more with you about this sweet little birdcage that I put together for Nina's room.

First of all, I picked up the cage itself from a church rummage sale months ago. I think it was $1. Then I got the little nest at Hobby Lobby (maybe $3?), and the blue eggs from TJ Maxx on clearance ($4?). The birdcage is hanging from a simple hook in the ceiling, using a ribbon I had in my stash.

Most importantly, the birdies themselves! Aren't they precious? I got them on Etsy from Megan at My Sweet Pumpkin. She custom sewed Nina's name on each of them, and even went out of her way to find the exact colors I asked for: pale pink, pale yellow and sage green. I think I paid $5 or $6 for each of them. Totally worth it!

I wanted to hang something in the corner of Nina's room to give it more dimension. (Check out my last post if you want to see her whole room put together!) The birdcage is perched high enough so we can enjoy looking at it, but little hands can't grab it. Gotta have a strategy with 22-month-old Hurricane Henry lurking around! :)

I'll be back on Friday to tell you about the desk in the other corner of the room. Have a great day!


9.07.2010

Shadowboxing

I am constantly tearing pages out of all kinds of magazines, then stashing them in books for inspiration. You just never know where the next idea will come from! Here's one that popped up in a recent Pottery Barn Kids catalog. It's a shadowbox with a little baby onesie perched inside.

With that as inspiration, I remembered a baseball jersey we had tucked away with Nina's name embroidered on it. Sadly, it's too small now, but I can remember receiving it when she was a baby and thinking "There's no way that will ever fit her!"

So I bought a shadowbox at Hobby Lobby. I added some hooks on the back so I could affix a grosgrain ribbon. I had a piece of scrapbook paper that made a perfect backdrop. And then it was just a matter of folding and pinning the jersey in place.

How cute is that?

I was always afraid of shadowboxes for some reason, but they're quite forgiving and easy to work with. I encourage you to give them a try if you've got an odd-shaped something-or-other that you'd like to save. It's a great way to get things out of the boxes in the basement and up on your walls!


9.02.2010

Procrastination Via Topiary

Why is it that, faced with the overwhelming task of moving my family to San Francisco, I start doing little projects around the house? For a couple of weeks over the summer, I was fanatical about getting piddley stuff done instead of the obvious jobs of packing, organizing and moving. Oh, well.

Here's an example of what I am talking about. I love the little greenery ball in this inspiration photo. Can't remember where I saw it, though.

I got some fake greenery from Hobby Lobby, as well as a foam ball. I already had the base, also originally from Hobby Lobby a few years ago.

I cut the greenery into manageable pieces, and then spent some time sticking each piece into the foam. No glue gun, just lots of poking.

Eventually I ended up with a slightly fuller topiary than my inspiration photo, but still...not bad!

So, next time you should be packing for a cross-country move, try this instead.

Maybe it'll look really cute in your new house!


8.02.2010

Loose Ends on a Lamp

Hey girls! How was your weekend? My husband and I celebrated our sixth wedding anniversary with a night out on the town...gotta say, it was pretty great! How about you?

Just had a bit more to share about this old lamp of mine. Are you sick of hearing about it yet? See, I keep walking by it when I go down to the basement, and something's been bothering me.

I love the G, but it seemed a little pale, as if the black paint wasn't dark enough. So I went out and grabbed some fabric painting medium. Just add some of this stuff to regular acrylic paint, and it turns it into fabric paint!

I just went over my G with a fine paintbrush and some of this concoction. Don't know how well the photos show the difference, but I am so much happier with how dark the black is now. It makes it look more professional, rather than something I drew on with a paint marker. (Which is exactly what I did, but whatever. I don't want it to look that way!)

In other news, my dad sent me a few photos from his cabin in the Ohio woods! Turns out he converted an old milk jug, too. This one used to belong to my grandparents, and he painted it and added the star. My dad's an Army veteran and a huge Civil War buff. (And yes, he made that soldier, too. How cool is that?) Oh, and doesn't that photo make you want a cabin in the woods too?

Years ago, my dad also converted this old fire extinguisher into a lamp. I can totally remember sitting on the porch as a kid, reading next to this cool relic. It now sits on my dad's covered front porch and makes a great place to curl up with a book or listen to an Indians game.

It's just a reminder to me to think outside the box with some of these cool pieces that you can find at thrift stores, antique shops, and garage sales. I mean, all this stuff would look right at home in a Pottery Barn or Restoration Hardware catalog if you ask me! But it's got a history much more interesting than being ordered online and shipped to our doorstep. And isn't that what we love?


7.30.2010

Lampshade: The Results!

Thank you, thank you for your advice on the lampshade! Remember this? Cute, but I wondered if it needed something.

People gave me all kinds of suggestions, and in the end, I combined these two photos. I decided to do a black embellishment on the lampshade itself, but not a bee.

And I liked the idea of doing a letter for our last name, like this lamp:

So I printed out a big G on my computer. (The font was called Gessele Regular, if you want to use it.)
I traced the G onto the lampshade using graphite paper. It didn't come through super-well, but I was able to see it enough. Then I used a black fabric marker to fill it in (got mine at Michael's):
And here it is! You all know I must like you, because I am showing you the lamp as it sits in my basement "lamp graveyard." My husband still needs to rewire it before this little lady gets to be displayed in my living room!

But still, I am thrilled with the results. Thanks again, and have a great weekend!


7.26.2010

Lampshade Advice

Remember I told you I was nesting, but almost in reverse? Knowing that once we move to California, I might (gasp!) not be able to find my hot glue gun for awhile...well, that's got me all fired up! And since I feel rather helpless and immobile as we wait to sell our house, I find myself inventing projects to keep the stress at bay.

Here's my latest. It's an old milk jug that used to be my mom's, converted into a lamp. I love it!
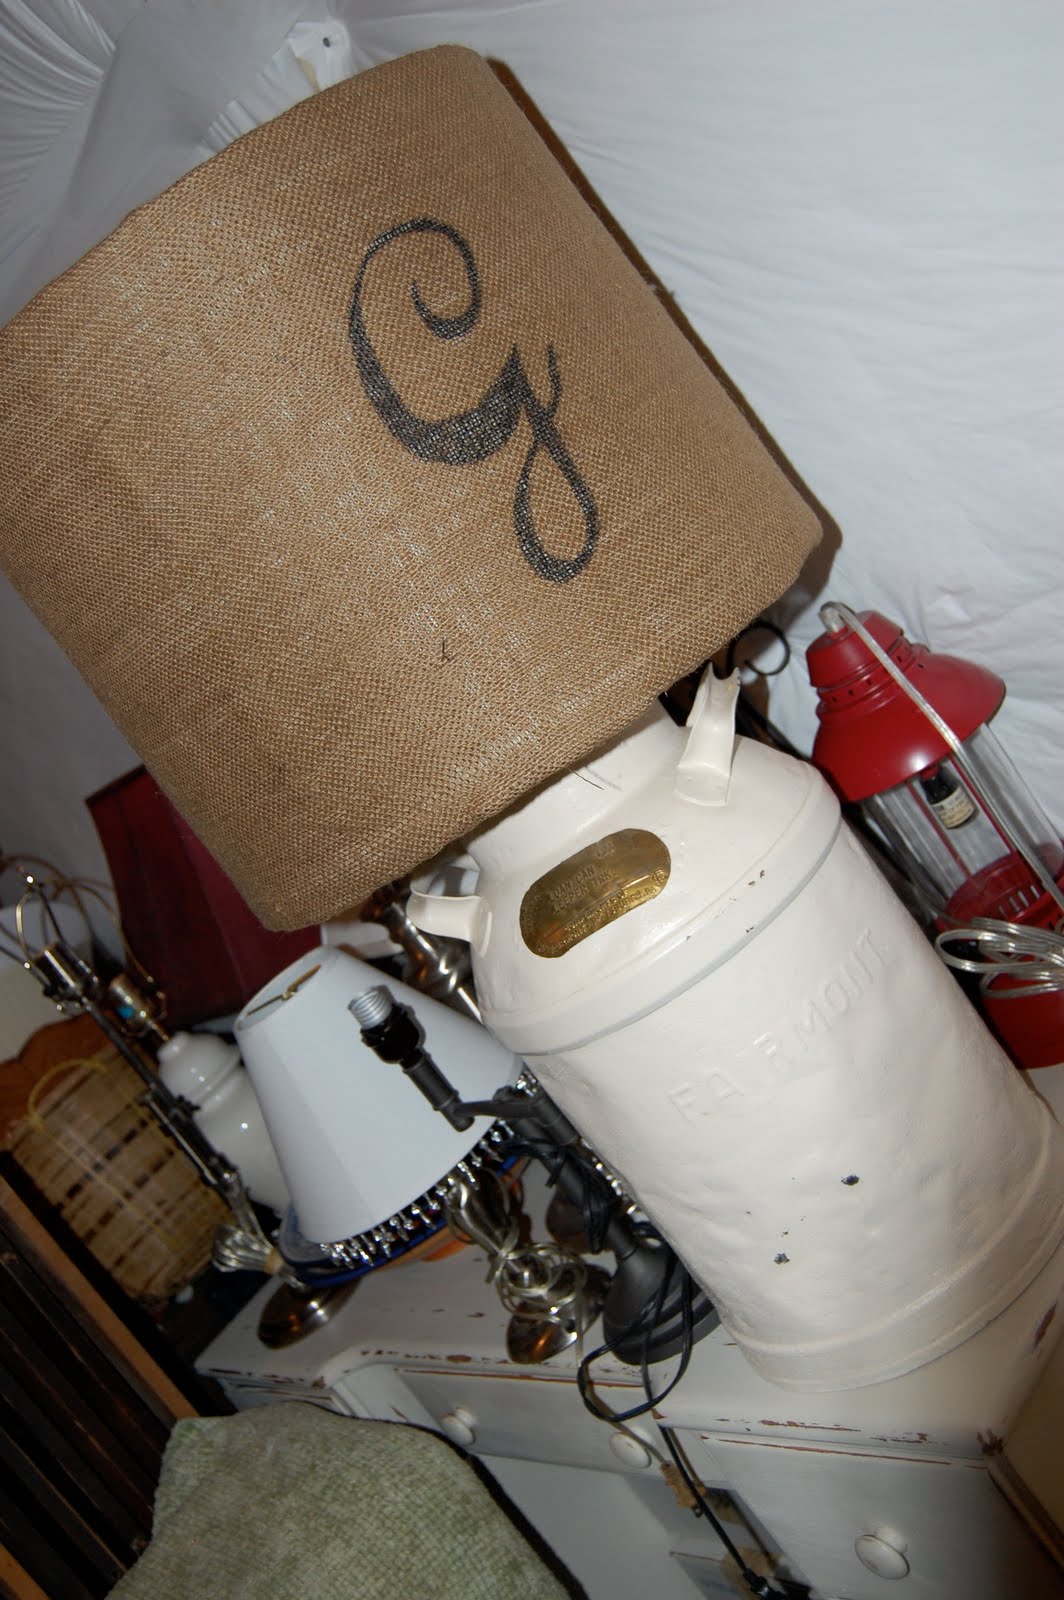
ItalicIt's absolutely huge! And it's currently being re-wired by my handy husband, who is not quite so energized by my projects, but is nice enough to comply.

The old lampshade was classic 1970s, and it had to go. So I recovered a Goodwill shade with some burlap. I love how it looks, but now I have a dilemma. Should I add anything to the shade, do you think? Maybe something like this bee?

Or maybe a letter or some numbers, kind of like on this lamp, but on the shade instead of the base?
OK girls, I need your advice! What would you do?

Thank you!!


7.05.2010

My Refinished Tool Box

First of all, thank you SO much for your encouraging words about our move to San Francisco. I get totally overwhelmed if I think of all the details, so your comments help me to slow down and just take one step at a time. We are meeting with our real estate agent later today, so I will keep you posted!

I've been thinking about all my stuff, and which items to keep, which to sell, and which to re-vamp for our new (slightly cramped) California lifestyle. A long time ago I told you about this antique tool box.

I bought this tool box for my husband eight years ago. I envisioned us, boyfriend and girlfriend at the time, stripping and refinishing it together. Instead, during stolen naptime moments, Brent and I finally finished re-building and re-finishing this piece and decided that it would be great to store our two kids' toys. Never thought the project would take quite this long, but it's funny to see how far we've come!

Anyway, here's the story. The box had some water damage, and my talented husband removed the damaged boards and replaced them with new pine. I stripped the old finish off of the box, sanded it, and re-stained it (so that the old and new wood would match) with Minwax Early American stain. For a more complete tutorial on refinishing furniture, check out my series from last summer, which starts here.

The cool thing is that the original marks and imperfections still come through. And those are the original handles on the sides!

I sealed it with three coats of polyurethane in a matte finish. This tool box, eight years in the refinishing, is ready to hold all the toys our kids can throw at it.

Just in time, since our move to California will demand that we use every inch of space available to us. I need to get really creative with my storage options, girls! I'm thinking that this tool box might be a better place to store the kids' toys than, say, the kitchen oven?

Have a great week!